With the advent of fast interactions that do not necessitate the use of the entire screen, the bottom sheet is quickly becoming an indispensable component. Every application now offers this function, which can be used for various tasks such as signing up for a newsletter, dividing a bill, making a payment, and even sharing something fascinating with others.
This functionality is becoming increasingly common in mobile application development. When you hire flutter developers from Flutter Agency, you will come to know that this feature is made much more apparent in Flutter’s design.
Draggable scrolling bottom sheet is by far the most user-friendly framework we’ve come across for developing this type of component. It is essentially only a matter of invoking a simple function. So that will be brief and to the point.
In this blog post, we discussed the description of the Flutter bottom sheet, as well as how to construct one in the Flutter application itself. By the end of this post, you will undoubtedly have a better understanding of the sequence of creation.
What is the Flutter bottom sheet?
The simplest way to explain it is that Flutter bottom sheets are extra surfaces that are typically utilized on mobile devices. Additionally, it guides the app’s creators on how and when to employ particular functionalities.
This thing’s launching principle is pretty simple: it glides up from the bottom to present the user with additional possibilities. It’s possible that you’ll come across a bottom sheet in the Google Maps app.
Types of Flutter bottom sheets
- Persistent Flutter bottom sheet
As implied by the name, it occupies a permanent position at the bottom of the screen. A user may see the whole Flutter bottom sheet in full by pulling the bottom sheet up vertically. Thanks to the component’s raised position, the user can see more alternatives or app information.
- Modal Flutter bottom sheets
Similar to how the name implies, these sheets operate as conversations or Modals. When engaged, it casts a shadow over the activity or fragment.
When we tap outside the Flutter bottom sheet, it is dismissed much as a modal dialog box. The ability to activate and deactivate it may also be achieved by sliding up and down the screen.
How to create a Flutter bottom sheet?
Getting started
To begin, delete the default code. We’re going to write our own. We’re going to construct a floating action button that, when clicked, will open a Flutter bottom sheet.
A scaffold is required to construct a floating action button in Flutter. In flutter, scaffolding enables us to leverage Material Design components such as the AppBar, hovering action button, and navigation drawer.
Step 1: Begin by creating a new project
As is customary, all that is required to establish a new component for the Flutter bottom sheet is to send a function pointer to the floating action button’s onPressed event. This is the method where we’ll be able to write our code in the Flutter framework. It should look something like this:
import ‘package:flutter/material.dart’;
void main() => runApp(MyApp());
class MyApp extends StatelessWidget {
@override
Widget build(BuildContext context) {
return MaterialApp(
title: ‘Flutter Demo’,
theme: ThemeData(
primarySwatch: Colors.blue,
);
home: MyHomePage(title: ‘BottomSheet demo’),
);
}
}
class MyHomePage extends StatefulWidget {
MyHomePage({Key key, this.title}) : super(key: key);
final String title;
@override
_MyHomePageState createState() => _MyHomePageState();
}
class _MyHomePageState extends State<MyHomePage> {
@override
Widget build(BuildContext context) {
return Scaffold(
appBar: AppBar(
title: Text(widget.title),
),
body: Center(
child: Column(
mainAxisAlignment: MainAxisAlignment.center,
children: <Widget>[
Text(
‘Click here.’,
),
],
),
),
floatingActionButton: FloatingActionButton(
onPressed:() => displayBottomSheet(context),
child: Icon(Icons.add),
),
);
}
}
Step 2: Call showModalBottomSheet for establishing Flutter bottom sheet
After writing all of the code above, it’s time to advance the bottom ones. Thus, all we need to do is use showModalBottomSheet, a flutter-provided function. It requires a context and a constructor function.
As our constructor function, we’ll make use of an anonymous function. Additionally, we’ve used MediaQuery to restrict the thickness of the Flutter bottom sheet to 40% of the screen height. As a consequence, the code set will look exactly as follows:
import ‘package:flutter/material.dart’;
void main() => runApp(MyApp());
class MyApp extends StatelessWidget {
@override
Widget build(BuildContext context) {
return MaterialApp(
title: ‘Flutter Demo’,
theme: ThemeData(
primarySwatch: Colors.blue,
),
home: MyHomePage(title: ‘BottomSheet demo’),
);
}
}
class MyHomePage extends StatefulWidget {
MyHomePage({Key key, this.title}) : super(key: key);
final String title;
@override
_MyHomePageState createState() => _MyHomePageState();
}
class _MyHomePageState extends State<MyHomePage> {
void displayBottomSheet(BuildContext context) {
showModalBottomSheet(
context: context,
builder: (ctx) {
return Container(
height: MediaQuery.of(context).size.height * 0.4,
child: Center(
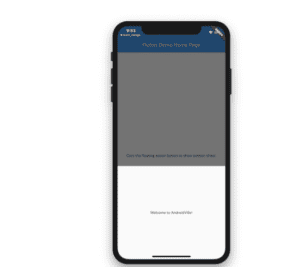
child: Text(“Welcome to AndroidVille!”),
),
);
});
}
class _MyHomePageState extends State<MyHomePage> {
@override
Widget build(BuildContext context) {
return Scaffold(
appBar: AppBar(
title: Text(widget.title),
),
body: Center(
child: Column(
mainAxisAlignment: MainAxisAlignment.center,
children: <Widget>[
Text(
‘Click the floating action button to show bottom sheet.’,
),
],
),
),
@override
Widget build(BuildContext context) {
return Scaffold(
appBar: AppBar(
title: Text(widget.title),
),
body: Center(
child: Column(
mainAxisAlignment: MainAxisAlignment.center,
children: <Widget>[
Text(
‘Click the floating action button to show bottom sheet.’,
),
],
),
),
floatingActionButton: FloatingActionButton(
onPressed:() => displayBottomSheet(context),
child: Icon(Icons.add),
),
);
}
}
Step 3: Sequence of testing and pre-launch
After completing all of these scripts, it’s time to publish your masterpiece. While the building process is straightforward, we must constantly test our applications, particularly with Flutter.
You may also hire healthcare app developers from Flutter Agency to do so. It would be best to consider the following: persistent Flutter bottom sheets are viewpoints that rise from the bottom of the screen and are lifted above the rest of the contents on display. They may be vertically dragged to reveal or conceal more or less of their material.
Conclusion
This blog provided a full description of the Flutter bottom sheet definition and demonstrated how to construct a bottom sheet in Flutter application development. Following that, we feel that after reading the guide, you will be much more adept in developing this sort of module for ecommerce. Moreover, we hope that provides you with a better understanding of the potential of the fundamental functionality for improving user experiences.
Also read create a Draggable Scrolling Bottom Sheet Inside Google Maps